The most common fishing line knots for anglers are the improved clinch knot, the palomar knot, the surgeon’s knot, the hangman’s knot, the snell knot, the figure 8 knot, and the albright knot.
| Knot Name | Application | Strength out of 10 |
|---|---|---|
| Improved Clinch Knot | General purpose fishing knot, suitable for most situations with mono or fluorocarbon lines. Ideal for small lures and baits. | 8 |
| Palomar Knot | General purpose fishing knot is suitable for most situations with mono or fluorocarbon lines. Ideal for small lures and baits. | 9 |
| Surgeon’s Knot | Used primarily for tying two lines of different sizes together. Ideal for attaching leader material to the main line. | 8 |
| Hangman’s Knot (also known as the Uni Knot) | Very versatile, can be used for attaching the line to the lure, hook, or swivel. Works well with mono, fluorocarbon, and braided lines. | 8 |
| Snell Knot | Best used for attaching hooks to leader material. Known for maintaining hook’s alignment and strong holding power. | 9 |
| Figure 8 Knot | Typically used for making loops at the end of lines or leader material. Not commonly used for bass fishing. | 6 |
| Albright Knot | Primarily used for joining lines of different materials or diameters. Great for connecting braided line to mono or fluorocarbon leader. | 7 |
Your fishing equipment and ability to properly utilize it will always be essential to your success as an angler. One of the most overlooked aspects of fishing equipment and gear is the many knots used by anglers on freshwater lakes, rivers or even the open ocean.
The knot that connects your fishing hook or lure to your reel is of critical importance and could determine whether or not you’ll land your catch. This article will guide in identifying fishing knot types that every angler should know, how to tie them, and when to use them.
Table of Contents
1. Improved Clinch Knot
One of my personal favorite types of fishing knots, and one that I use regularly for a variety of different lures, rigs, and baits is the improved clinch knot. This knot is often referred to as the fisherman’s knot by some anglers, but it’s more widely recognized as an Improved Clinch Knot based on the technique used to create this useful method of securing your hook.
The improved clinch knot works best with braid or monofilament fishing line but can also hold up quite well with fluorocarbon. I would recommend that every beginner angler start by learning this knot as it’s one of the strongest and most simple types of fishing knots you can use.
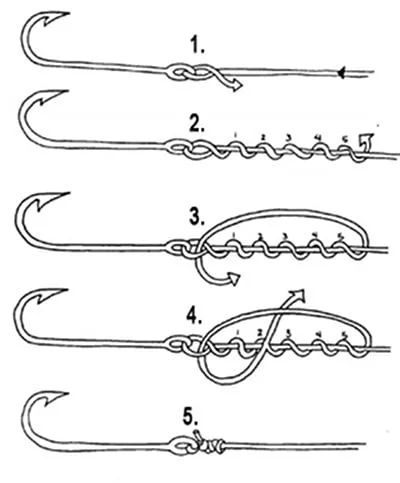
How to Tie It
Here’s how to tie the improved clinch knot:
- Run the line through the hook’s eye with roughly 6 to 8 inches of line from the end of the eye
- Holding the line in front of and behind the hook eye in place, rotate the line until you have 6 ‘twists’ above the eye
- Run the end of the line through the bottom opening between the eye and the first twist
- Pull the line through and run the end through the loop on top, pulling downward toward the eye
- Pull on both ends of the line in front of and behind the eye to tighten and secure the knot
The improved clinch knot works with just about any lure or hook you want to use and will work as a go-to knot when you’re unsure of what type to use with a new lure or hook.
2. Palomar Knot
Another handy knot that will work in various situations is the Palomar knot. This one is also straightforward and should be one of the first fishing knots you attempt to learn or teach to a young angler.
The Palomar knot is said to be the best for fishing with braided line and is extremely useful for saltwater anglers or anyone who wants to be able to quickly and easily secure their hook. It’s also probably the quickest knot you can tie if time is of the essence.
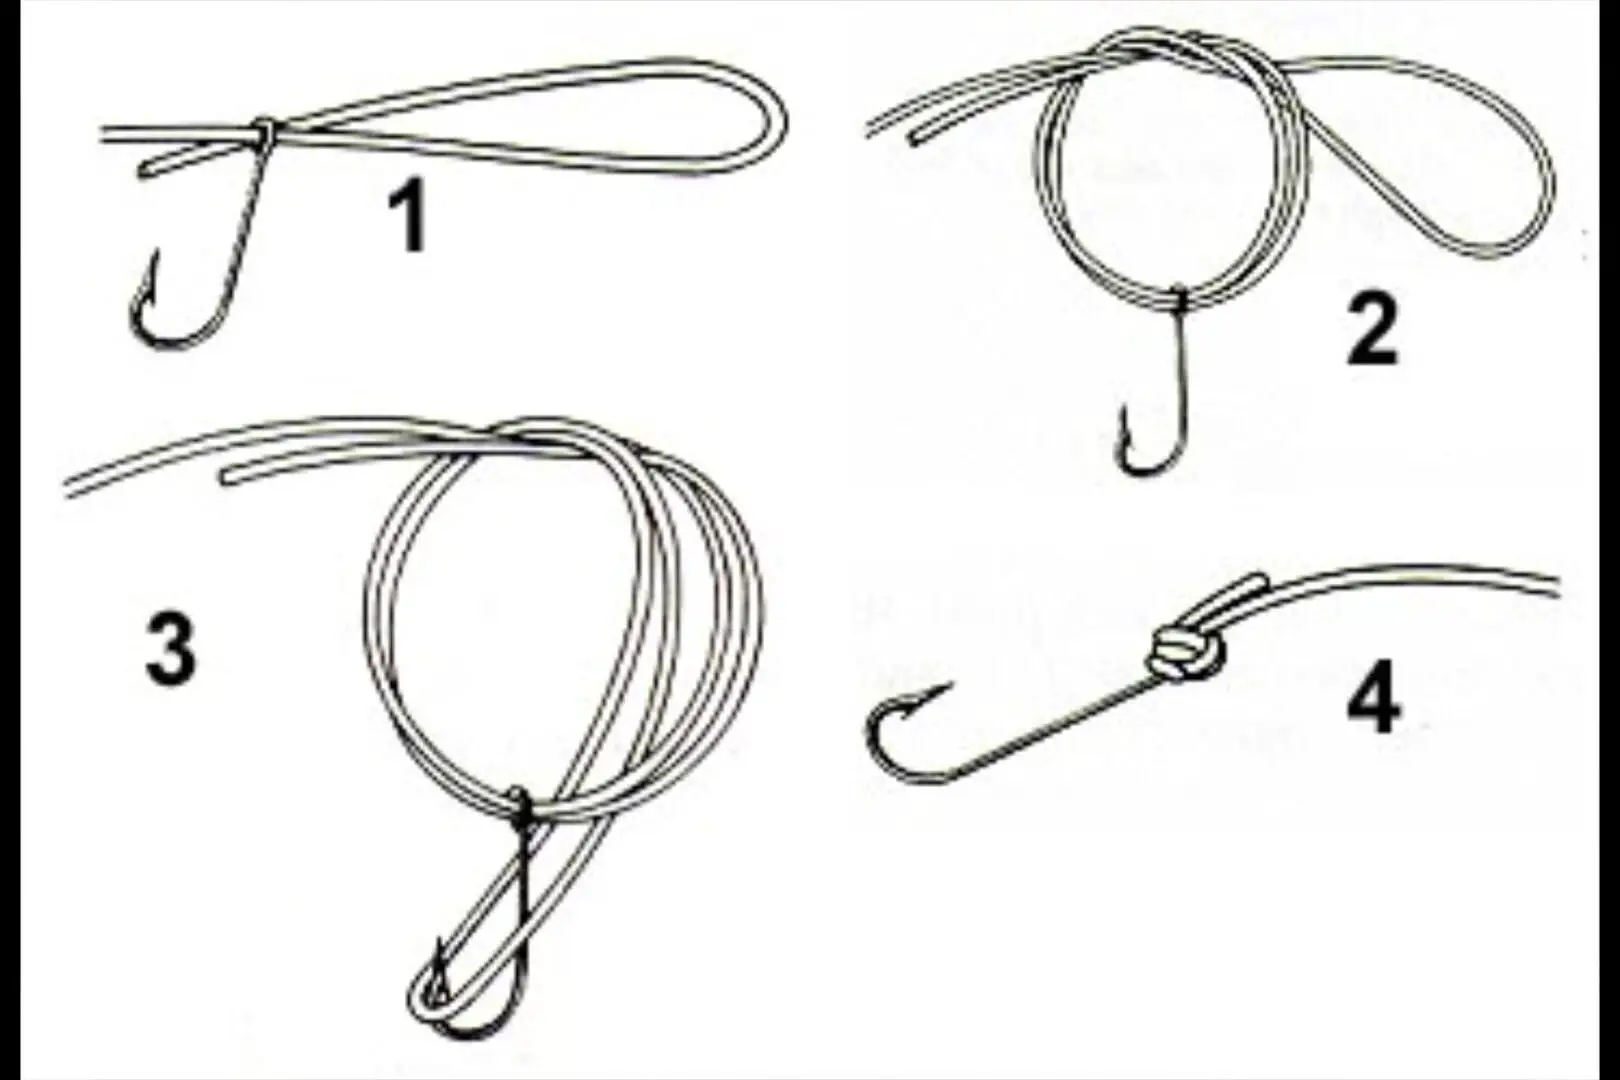
How to Tie It
Here’s how to tie a Palomar knot:
- Double-up the line until you have about 6 to 8 inches
- Run the doubled up end through the eye until you have around 4 to 6 inches of doubled line through the eye
- Create a simple overhand loop using the doubled-up excess line
- Loop the doubled-up end of the line over the hook and pull down until the knot is secure on the eye
This is arguably the easiest knot you can learn and will work on virtually any type of lure or hook you want to use it on for saltwater and freshwater fishing.
3. Surgeon’s Knot
The surgeon’s knot is one of the strongest types of knots you can use, and its primary purpose is to join two lines together. It was named the surgeon’s knot because it was used by surgeons to securely join two threads in a suture before the use of modern methods for stitching.
The surgeon’s knot is excellent for connecting your main line to a leader line if you don’t have a barrel swivel or other means to connect them. It’s handy for anglers who often use different line types for their main and leader lines.
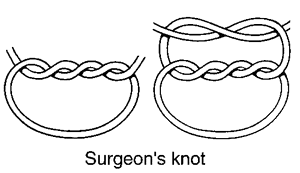
How to Tie It
Here’s how to tie a surgeon’s knot:
- Start by laying your main line and leader line next to each other, overlapping them around 10 inches or so
- Secure the ends of both lines with both hands and form a loop in the middle
- Take the leader line’s end and form a simple overhand knot, running it through the main loop
- Repeat the last step so that the leader line is wrapped around the loop twice
- Dip the knot into water to lessen the stiffness and pull both ends away from one another until the knot is tight
Some anglers will trim the excess line, but others often leave several inches and tie a dropper rig to increase their chances of hooking a fish.
4. Hangman’s Knot (Uni-Knot)
The hangman’s knot is a standard method of securing your main line to any hook or lure you want to use. It works well with any line but is most secure with monofilament fishing. This one is very similar to the improved clinch knot in that it utilizes a system of loops to better tighten the line’s hold on the eye.
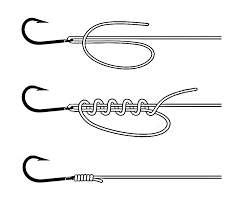
How to Tie It
Here’s how to tie the hangman’s knot:
- Run the main line through the eye and leave about 10 inches through on the end
- Keeping the main line doubled-up with the excess, create a simple loop using the single strand of excess line
- Use the tag end to wrap the excess line around the doubled-up lines about 6 times
- Pull the excess line’s tag end until the knot tightens on the line, then dip the knot into water
- Secure the hook in one hand and the main line in the other and pull the knot downward and secure it onto the eye of the hook
The hangman’s knot is great for fishing with a heavy line targeting larger fish. It’s one of the strongest and most secure knots that will work in various situations.
5. Snell Knot
Once you become more advanced in your fishing skills, you’ll want to use more specialized knots that will work to your advantage depending on the particular technique you’re using. Professional bass anglers often use the snell knot as it’s ideal for using with a baitcaster reel for flipping or pitching jigs and other types of lures under docks, tree limbs, and other types of cover.
The snell knot does better to keep the hook secure and prevent it from rotating as the fish pulls and dives when you’re fighting it. This knot is ideal for braided line and also causes the hook to remain at a secure angle, which will go a long way to ensure the hook won’t pop out of the fish’s mouth.
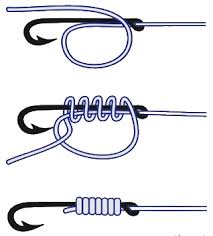
How to Tie It
Here’s how to tie a snell knot:
- Run the line through the hook, keeping the line next to the hook or parallel to it
- Create a single look with the line next to the hook shank before running the tag end back down through the eye
- Holding the loop and hook in one hand, secure the tag end with the other
- Wrap the tag end around the loop about 5 times, securing it against the hook shank and leaving a small loop at the end
- Be sure to wrap around the loop and shank back towards the eye of the hook instead of towards the hook point
- Run the tag end through the small loop at the end near the hook’s curve
- Pull the tag end downward while using your other hand to pull the main line upward, tightening the hook
6. Figure 8 Knot
One of the most well-known knots for saltwater and freshwater anglers is the classic figure 8 knot. This one has been used for centuries by anglers fishing with a rod and reel and comes in extremely useful for adding another hook to your rig to use two different types of bait or lures.
I prefer a loop knot when fishing with a saltwater rig for snapper or pompano along the shoreline or near shallow reefs. The Figure 8 knot allows you to connect your own choice of leader line, or two different types of leaders to the main line.
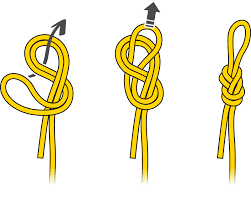
How to Tie It
Here’s how to tie the Figure 8 knot:
- Double-up your line and pull out enough to create a large loop that’s about 6 to 8 inches across
- Bring the doubled-up end around the line and create a figure 8
- Run the doubled-up end back through the first loop
- Pull on the doubled-up end and on the main line to tighten (you may want to dip this knot into water to help loosen the line)
- Now, you’re ready to tie another line to this loop directly onto the main line
The Figure 8 knot is also useful for connecting your main line to a leader if you don’t have a barrel swivel. Remember that it works best with braided line and is similar to what anglers call a Bimini Twist.
7. Albright Knot
The Albright knot is generally used to connect fly fishing line to your reel’s backing but can be used for other applications such as connecting your main line to a leader line. If you’re interested in fly fishing, this is a knot that you must learn to maximize the chances of adequately connecting your fly line with backing, which will significantly affect your ability to make a good cast.
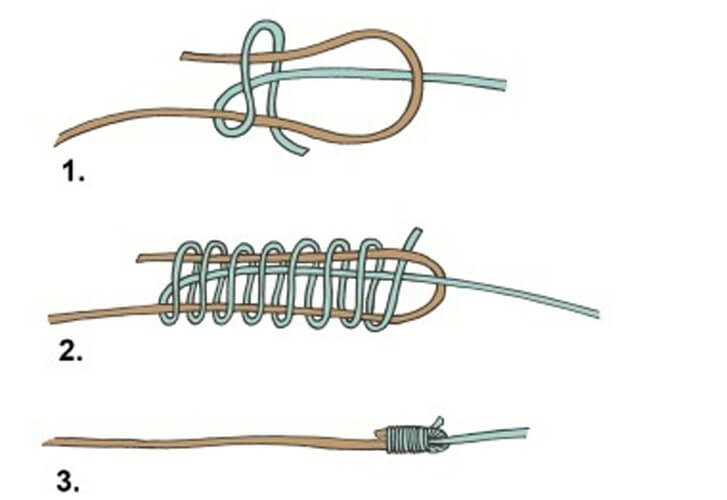
How to Tie It
Here’s how to tie an Albright knot:
- Start by doubling up your main line, or your backing line until you have roughly 8 inches of doubled-up line
- Pull the leader line through the middle of the backing or main line and leave roughly 10 inches of line hanging over
- Using the leftover tag from the leader line, use this tag to wrap the line around your doubled main line, as well as the strand of leader line
- Wrap the leader line tag around this section of three strands at least 4 or 5 times
- Take the remaining tag end of the leader line and run it through the small loop
- Holding both strands of the backing firmly, pull the leader line’s tag end downward to tighten
- Pull both ends of the leader line, one at a time to fully tighten and secure the Albright knot
You can use your fingers to push the coils down toward the main knot and it might help to dip the lines in water before you fully snug them up and secure them.
Conclusion
Some of these knots are more difficult than others and it’s recommended that you practice each one before you attempt them while fishing. It’s best to start with a moderately-thin rope, which will allow you to get a better visual understanding of exactly where each strand and loop needs to go and where you should tighten the knot.
These 7 types of fishing knots are some of the most useful for anglers and learning how to use them will greatly improve your fishing skills.
